Table of Contents
Overview of Workspace
The user interface of Adobe Acrobat has 3 views: Home, Document and Tools
Besides this, the document can have either one of both the interfaces – a Single Document interface (this means viewing one document at one time), or the Multiple Document Interface (interface that is tabbed for viewing multiple PDF’s)
Home

This is the landing page or the gateway when there is no PDF opened in the Acrobat
Document
When any document is opened in the Acrobat, this works as a ‘default’ view. Every document opens as a tab in the same window when you open more than one document.
Tools
To discover the many tools that are available in the Acrobat, this is the place you go to. This view displays all the tools available.
Home view
When you do not have any page opened in the Acrobat this works as the landing page. This gives you access to the shared files, recent files, to-do tasks, frequently used tools and also storage accounts.
- Recent Files View
This is a unified files list that is shared by you or shared with you for reviewing, viewing, or even signatures besides the files that are opened for viewing from your Desktop, Computer, storage of Document Cloud or even storage of third party like DropBox, OneDrive, Google Drive or SharePoint. The files are labeled as ‘Unshared’, ‘Shared by you’, or ‘Shared by Others’. This depends on the action that has been taken on the file. Next to the name of the ‘shared file, you have the ‘Comment’ icon indicates that this is a review file. In case there is no icon next to the ‘shared file’, then it means that the file is shared only for the purpose of viewing.
For a file that is selected, you find a details panel that is placed on the right. This shows a thumbnail preview of the specific file along with the tools that were recently used. The option of ‘Remove from Recent’ helps you to remove files selectively from the list of ‘Recent files’. Once you sign out of Acrobat DC, the ‘Recent files’ list is all clear.
Note: In the mobile app of the Acrobat Reader, the agreements for signature do not appear in the list of ‘Recent Files’. You can see this notification and the ‘To Do’ cards for those pending sign agreements for completion.
- Starred Cards
For ease of access, this displays the files that are starred by you, as cards. To view these starred files you need to ‘Click’ the ‘Starred’ tab that is placed in the left pane. The file is important when you star this and you can access these across your devices later. These files that are starred are copies to the ‘Document Cloud’. You need to choose ‘Edit > Preferences’ in the tab ‘General’ and deselect the option ‘Show Starred Files in Recent Tab’ to hide the starred files from the Acrobat ‘Home’.
- Getting started cards
This section has the list of tools that are commonly used in Acrobat, like Organize Pages, ‘Create PDF’, ‘Combine Files’ and more. You also get an option to set the Acrobat as your ‘default’ application for your PDF’s. For hiding the ‘Tools’ you need to select ‘Collapse all’ from the ‘Option’ menu (…)
- Search Files
You can search all the recent files from the Search box at the ‘top-center’. This includes files shared by others or you and documents cloud files.
- Notification Bell
You are notified for any changes in status in the shared documents by this ‘Notification’ bell. This displays all the notifications about the outgoing and incoming requests for the documents that are shared for reviewing, viewing, and also signing.
- Context pane
You can take any action on different files across all the tabs on ‘Home’ view, that which are ‘context-sensitive’. You see a details panel on the right when you select a file. This offers a ‘thumbnail preview of the file along with a list of all the tools that are used frequently. You can perform the required action on any file with the help of these tools.
- Shared Files for Viewing and also Reviewing
In this section of ‘Shared’, you can not only track but also manage the ‘shared’ files. The shared files are grouped depending on the work stream for easy access. In ‘Shared by you’ you have all the files that you have shared, and the files that are shared by others to you are listed on ‘Shared by Others’. The options that are available are displayed on the right pane when you make a choice of a file.
- Agreements shared for signature
This is a list of agreements either shared by you or to you for signature. This helps you in tracking the agreements that are out for signature, waiting for signature or signed.
Online Storage Account
This storage lists online and offline places from where you could access the files you need. Besides your local computer, you can access the files:
- Those are stored in a secure manner in Adobe Document Cloud by making use of the link of the ‘Document Cloud’ in the left pane
- The online accounts, like Dropbox, box, OneDrive, Google Drive, and also Microsoft SharePoint. You can make use of the ‘Add account’ link for adding the accounts. This is placed on the left pane
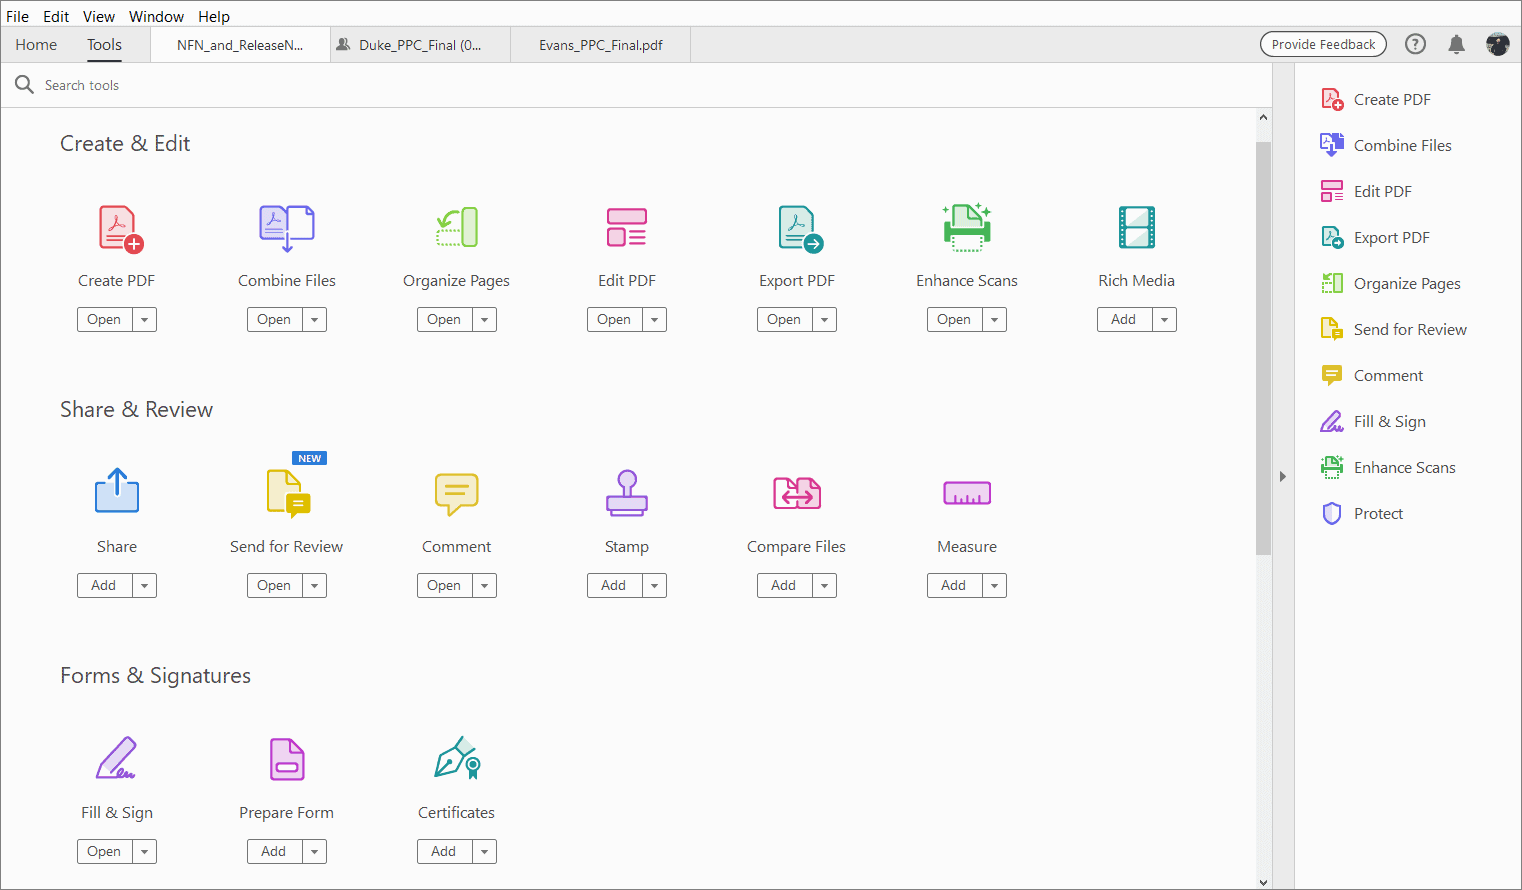
Tools center
For discovering and navigating tools available in Reader or Acrobat this is the ‘go-to’ place. You have categories listing the different tools. Once you make a choice of a tool, the commands specific to that tool can be seen in the document view if you have opened a file.
Some tools can be opened without opening any document. You will get a prompt to open a document only if the chosen tool requires a document.
Add or Remove Shortcuts of Tools in the Right Pane
For adding any shortcut of a specific tool in the right pane, you need to click on the ‘Add’ button placed below the name of the tool.
To add a tool, you need to drag the chosen tool to the right pane.
For removing a shortcut of a specific tool from the right pane, you need to click on the ‘Down’ Arrow button that is next to the ‘Open’ below the name of the tool. Choose ‘Remove Shortcut’.
For removing the shortcut, you need to click the ‘cross’ button for the specific shortcut in right pane.
Document View
You find the tabbed interface for viewing multiple PDF’s by default. Each of the PDF opens as a ‘tab’ when you open many PDF’s in the same window of the application. You are able to switch among the different tabs from the top. The name of the tab is seen from the top of the file. You also have the ‘next’ and ‘previous’ button towards right for navigating through the tabs when there are many documents and do not fit the document ‘view’.

The tool bar and also the Menu bar can be seen at the work area’s top. The stand alone application’s work area includes a pane in the middle, a pane for navigating on the left and a task or tools pane on the right. The PDF’s are displayed on the document pane. You can browse through PDF with the navigation pane. You can also perform different options on the PDF file. The Toolbars that are placed on top of the window offer other controls that can be used for working with the PDF.
Note: If you wish to get back to the single document view and switch off the tabbed view, you need to go to ‘Edit > Preferences > General’ and clear the given check box for – Open documents as new tab in the same window (requires relaunch)
Display Themes in Acrobat DC
You can also change the look and feel of the Acrobat. You need to set the display themes. Go to ‘View > Display Themes’ and select one theme from the list below

System Theme: Acrobat can change the UI depending on the OS theme when you make a choice of the ‘System Theme’. If the theme of the OS is changed when the Acrobat is running, then this, too, gets updated.
Dark Gray: For improving the visual egomaniacs and reducing strain to the eyes along with facilitating the use of the screen in dark environments you need to change the theme to ‘Dark Gray’. This can also conserve the battery power. This dark theme includes the contextual menu on-page, top menu, comments pane and the scroll bar.
Light Gray: Light Gray is the default theme of Acrobat. Besides the UI elements, the background of the documents appears light gray.
Menus and Context Menus
It is advisable to keep the menus of Acrobat visible so that these are easily available when you are working. If you need to hide these, you need to use the ‘View > Show/Hide > Menu Bar’ command. You can display and use these once again by pressing F9 (Windows) or ‘Shift + Command + M (Mac OS)
You can make use of the context menus so that you can quickly choose commands that are used commonly. When you ‘right’ click the area of the toolbar, the context menu shows the same commands as the ‘View > Show/Hide > Toolbar Items’ menu
- The pointer needs to be positioned over the document, panel or object.
- Click the ‘right’ mouse button
Note: (Mac OS) In case you do not have a mouse of two buttons you can display the ‘context’ menu by pressing the ‘Control’ key as you are clicking with the mouse.
Toolbars
You might not see many tools displayed in the tool bar, but you can always add tools for ease of access.
For adding tools to the toolbar, ‘right-click’ on an empty space in toolbar and choose the tools you need in this toolbar.
Quick Tools
Frequently used tools can be added to the ‘Quick Toolbar’ from ‘Tools’.
1.’Right-click’ on an empty space in the tool bar and choose ‘Customize Quick Tools’
- In the dialog box of the ‘Customize Tool Box’ you can do any of the listed
- For removing a tool, select the icon of the tool and click on the ‘Delete’ icon
- For adding a tool, select the tool in the left pane and ‘Click’ on the ‘up’ arrow icon
- For adding a vertical line for separating the different groups of the tools, you need to click on the ‘vertical’ line in the tool bar
- For changing a tool’s position in the toolbar select the icon of the tool and click on either ‘left’ or ‘right’
Adjust the position of Quick Tool cluster
You need to ‘drag’ and ‘drop’ the cluster of quick tool to adjust the position. The mouse has to be hovered around the tool cluster for displaying the ‘drag’ arrow (four-way). Then ‘click’ and ‘drag’ for repositioning the tool cluster towards the toolbar’s left. This position of the tool box cluster is retained during the different sessions.
Common Tools
You can add different tools to the toolbar of ‘Common Tools’.
1.’Right-click’ on any empty space in the toolbar
2.’Select’ tool from the menu
- For removing a tool from the toolbar, ‘right-click’ the tool and ‘deselect’ this from the menu.
Hide and Show Toolbars
For tidying up the work area you can close the toolbar, when your work does not involve using tools. You can also customize the toolbar for different PDF in an independent manner when multiple PDF’s are open. The different states that are customized persist when you switch between PDF’s.
- For hiding all the toolbars, choose ‘View > Show/Hide > Toolbar items > Hide Toolbars’
- For returning the toolbars to their default, choose ‘View > Show/Hide > Toolbar Items > Reset Toolbars’.
Note: You can press F8 for showing all the toolbars hidden.
Select a Tool
When Acrobat opens, the ‘Select Tool’ is open by default as this is a versatile tool.
You can either
- Select any tool from the toolbar or
- Choose ‘View > Show/Hide > Toolbar Items > (toolbar name) > tool
Create Custom Tools
You are able to assemble your customized collection of the features of Acrobat and save this and share it. You can quickly access the commands and tools you need most.

- Choose ‘Tools > Create Custom Tool
- You can do any from the listed for customizing the toolbar
- For adding a tool to the toolbar, the left panel needs to be clicked, select the ‘tool’ and click on ‘Add to the Toolbar’ icon
- For removing a specific tool, select the icon of the tool and click on the ‘Delete’ icon
- For changing a tool’s position in the toolbar, select the tool’s icon and click on either ‘left’ or ‘right’
- For adding a vertical line in order to separate the groups, click on ‘Add the Vertical line’
- Delete or Add tools in the Toolbar,
- Add instructions, custom panel, or a divider line between different tools,
- Arrange, rename or delete tools
- Add to Custom tool’s set on the right or to the toolbar of the tools above.
- To customize tools in the ‘Custom’ set do any of the listed
- Click the panel placed on the left when you need to add a tool to the ‘Custom’ set
- Click on the ‘Add’ section icon placed on the right for creating your own panel. Name the panel and click on ‘Save’.
- Select the panel placed in the right when you need to add a tool to the panel. Select the tool that is on the left and click on ‘Add to Custom set’ icon
- For removing a tool from the set, you need to select the icon of the tool and click on the ‘Delete’ icon
- For changing a position of a tool, select this on the right and click the ‘Up’ arrow or the ‘Down’ arrow
- For separating groups and adding a horizontal line, click on the ‘Add Divider’ icon
- For editing section name or instructions, select this and click on the ‘Edit’ icon
- When you have completed the tool set, click ‘Save’ and type the name and click on ‘Save’ again.
The custom tool created is added to the ‘Tools’ center. For opening the tool choose ‘Tools > (custom name of tool)
Edit, Delete, Rename or Share a Custom Tool
You can rename, edit, copy, share or rearrange tool sets. You can, also, be specific about the tool set’s order that appears in the men. This is done by moving them ‘up’ or ‘down’ in the list. You are able to share the tool sets with the workgroup by making use of the ‘Import’ and ‘Export’ options.
- Choose ‘Tools > (custom name of the tool) > Click on the ‘Down’ arrow and make a choice of the required option.
Navigation Pane
Different panels for navigation are displayed in the ‘Navigation’ pane. You find different functional tools here. For eg., the panel of ‘Page Thumbnails’ has thumbnail images of every page, and clicking on this opens the page.
The navigation pane s closed by default when you open a PDF. There are buttons placed on the left that allow you to access to different panels, like the ‘Bookmarks’ panel button or the ‘Thumbnail’ button. The navigation pane is not available when you open Acrobat but this is empty. This means, no PDF is open.
Show or Hide Navigation Pane
- to open the navigation pane, you can do any of the listed
- Click on any button on the panel on the left side of work area
- Choose ‘View > Show/Hide > Navigation Panes > Show Navigation Pane
- for closing the navigation pane, do any of the listed
- Click the ‘button’ for the open panel in the navigation pane.
- Choose ‘View > Show/Hide > Navigation Panes > Hide Navigation Pane
Note: The PDF creator is able to control the contents of some of the navigation panels and can make these empty.
Change the Display Area for Navigation Panels
All the navigation panels are in a column on the work area’s left side
- For changing the width of the pane, drag the right border
- For viewing a different panel, select the specific button for the panel. This is placed on the left of the navigation pane.
Options in a Navigation Panel
In the ‘upper-left’ corner all the navigation panels have a menu for ‘Options’.
Some of the panels also have other buttons. These can affect the items present in the panel. These buttons are different in different panels and there are some that have none.
Set Preferences
There are settings of different programs specified in the ‘Preference’ box. This includes settings for tools, display, signatures, conversion and also performance. Once these ‘preferences’ are set they remain the same till the time you change these.
- Choose ‘Edit > Preferences (Windows) or Acrobat/Adobe Acrobat Reader > Preferences (MacOS)
- Under ‘Categories’ select the ‘preference’ you need to change.
Restore (recreate) Preferences
Restore the Acrobat Preferences folder (Windows)
Restore the ‘Acrobat Preferences’ for eliminating any problems that caused damage to preference cause. Most of these problems are due to preferences of file-based, most of the preferences of Acrobat are stored.
Note: This solution tends to remove custom settings for JavaScripts, Collaboration, Color Management, Stamps, Web Capture, Autofill and Updater.
- Quit ‘Acrobat’
- In ‘Windows’ Explorer go to the ‘Preferences’ folder:
(Windows 10, 8 or 7) C:Users/(username)/App Data/Roaming/Adobe/Acrobat/(version)
Note: In the ‘Windows 10 or even 8, in case you are unable to see the folder of App Data, click on the ‘View’ menu on the ribbon of the Windows Explorer. Select ‘Hidden Items’ check box under ‘Show/Hide’
- 3. Move the ‘Preferences’ folder to any other location
- 4. Restart Acrobat
After restoring the ‘Acrobat Preferences’ folder, if there is a problem, then this problem is in no way related to the folder of ‘Preferences’. For restoring the custom settings, you need to drag the folder that you had moved in Step 2 to the original position. Then you need to click on ‘Yes to all’ for replacing the new folder of Preferences.
Restore the Acrobat Preferences files (MacOS)
It is important that you should restore the preferences file of Acrobat to eliminate the problems that was due to the damaged file of preferences.
Note: The settings are restored to their default when Acrobat preferences files are re-created.
- Quit Acrobat
- Drag the listed files from Users (Username)/Library/Preferences folder to Desktop:
Acrobat Webcapture Cookies
com.adobe.Acrobat.pro.plist or com.adobe.Acrobat.pro_x86_9.0plist
Acrobat Distiller Prefs and com. Adobe. Acrobat. Pro. Plist (when you troubleshoot with Distiller)
The Acrobat folder that contains preferences for forms (MRUFormList) collaboration (OfflineDocs) and color settings (AcrobatColorSettings.csf)
- Restart Acrobat
After you restore the preferences files of Acrobat if this problem recurs, then you know the problem is not due to the preferences files. For restoring the custom settings, drag the files that were moved in step 2 to the original location. Then click ‘OK’ to the alert ‘A newer item named’ (filename) already exists. Do you want to replace this with the older one you are moving?’
Under ‘Categories’ select the preference type you want to change.
Choose ‘Edit > Preferences > (Windows) or Acrobat/Adobe Acrobat Reader > Preferences (Mac OS)
Recent Posts
Security Warnings When a PDF Opens When you open a PDF you, at times, see a warning. This warning can come in many forms. What Does the Warning Mean? The warning asks if you trust those who...
How you view the PDF totally depends on the creator setting the document properties. Example, a document can open at a specific magnification or page. View PDFs in Read Mode For maximizing the...